Hello everyone! In this tutorial we’re gonna show you how to create a really cool looking puzzle animation in After Effects.You don’t need any external plugins (The optical flares animation is just an extra visual improvement it’s not necessary to have.However I included the optical flares version project file to those of you who want to modify the flare for example). I think this effect is really versatile so this will be a really useful stuff for you. Let’s dive in.
Tutorial
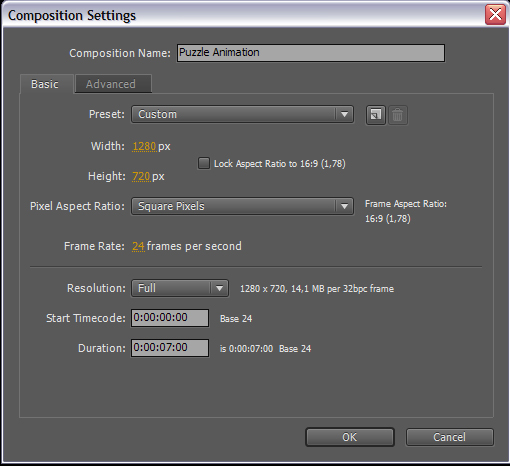
Step 1
Create a new composition clicking by Menu->Composition->New Composition. Name it as Puzzle Animation, change the resolution to1280×720 and set the duration to 7 seconds.
Step 2
Create a new solid clicking by Menu->Layer->New->Solid. The color is doesn’t matter. Change the resolution to 1280×720 and name it as ‘BG’.

Step 3
With the BG layer selected go to Effect->Generate->Ramp and apply the Ramp effect to it. Let’s change the properties. First set the colors. Start Color: #43324A End Color:#110E13 and let’s change the ramp shape to radial ramp.

Step 4
I’m not sure that you can see clearly in the picture below bot most of the time when we’re dealing with the ramp effect, we can get a weird artifact error.It’s looks like a whole bunch of colorful rings which is not too good.To avoid or fix this problem we have to apply the following effect: Noise.

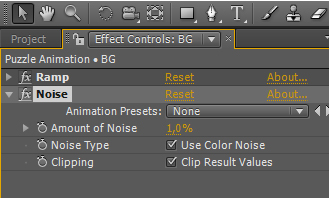
Step 5
Go to Effect->Noise&Grain->Noise and apply it and change the Amount of Noise value to 1%.
Step 6
The noise will reduce the opacity of the banding artifact error but it will be still noticeable so you have to increase the color depth as well by alt+left clicking on the 8 bpc "button". Change this value to 32 and it will fix a problem.

Step 7
Let’s import the Aetuts+ logo and put it over the BG layer and with the Aetuts+ logo layer selected go to Layer->Pre-Compose and select the Move all attributes into the new composition option.

Step 8
With the Logo composition selected, let’s turn the 3D switch on.
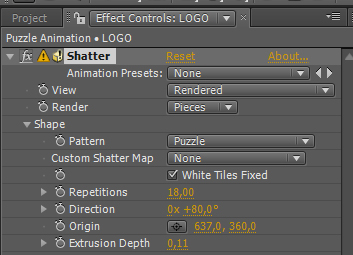
Step 9
With the LOGO composition selected go to Effect->Simulation->Shatter and let’s change the following properties. By the way, as you can see we have 2 error messages. The first triangle icon means that this effect doesn’t supports the 32 bit color depth and the second has appeared because we just turned on the 3D switch without a camera. It’s not a big deal everything will work fine don’t worry. Other important thing is you can change the thickness of the puzzle pieces by changing the extrusion depth property. If you want more pieces then increase the repetitions value.
Step 10
Let’s change the following properties: Under the Force 1 section, the Radius value is important because if your logo is bigger than the default Aetuts+ logo which I used in this tutorial then you have to increase this value to make a bigger puzzle surface. Also keep that in mind under the Physics properties you will find a Randomness property. This will randomize the puzzle pieces, however at the end of the animation this values must be 0 because if it’s higher than 0 you will see a weird puzzle piece with huge gaps. Let me just show you what I mean.

Step 11
If the randomness value is not 0 then at the end of the animation you can see the pieces doesn’t match perfectly with each other. Currently this is not a huge problem because we will fix it later.
Step 12
Under the Textures tab you can add a color or a texture to your puzzle piece. Keep that in mind if you are trying to use a texture (like a real photo texture) then you have to Pre-compose it first otherwise this won’t work. In this example I just used a simple color #616063 and I set this color to the Side and Back mode. Under the lightning option let’s change the Light Type to First Comp Light.

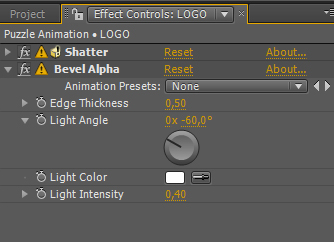
Step 13
Go to Effect->Perspective->Bevel Alpha and apply it with the following properties. It just gives a little extra highlight on the edge of the puzzle pieces.
Step 14
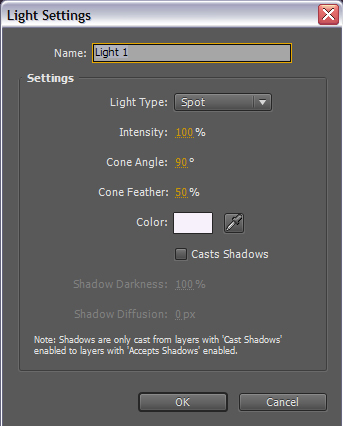
Let’s add a new light. Go to Layer->New->Light. You can play around with the light distance or you can use my settings below. This will make a more believable 3D looking scene with a little shadow falloff.
Step 15
Let’s set the following position properties of the light.

Step 16
We have to reverse the puzzle animation so select the LOGO composition and right click on it and select Time-Reverse Layer.

Step 17
We have a little problem. The animation is works fine, but at the end the whole animated logo piece disappears. The time remapping and the freeze frame solution is doesn’t work. I don’t know why, but we need an other solution. We can do two things. The first is really simple and primitive. With this logo layer selected, go to the last frame on the timeline (You can see the picture below) and hit the n and b keys on the keyboard. After that let’s render out this frame as a .jpg file. When the render is done, import this .jpg into after effects and put it over the LOGO composition layer. Let’s offset it to the end of the Logo composition layer. So basically the logo won’t disappear anymore, but what if the Background is animated? Here’s a better solution.

Step 18
The second idea is a little bit different. You have to duplicate the LOGO layer. I rename the duplicated version to Freeze logo. You have to go to the last frame and you have to trim it. After that open the Shatter plug-in properties and under the physics tab let’s change the randomness to 0.
Step 19
Let’s open the Shatter effect properties on the new duplicated freeze logo layer and the original logo layer as well. I just used the pickwhip tool to make a simple expression to connect the radius properties with the original logo composition. It’s important because if we use a different logo which is bigger than the current logo then we have to change the radius properties on every duplicate, but because of the expression everything will work fine.

Step 20
The expression part is done so we have to duplicate and offset the freeze logo composition.

Step 21
I made a lot of duplicates so I just turned on the shy button to hide all of these layers.

Step 22
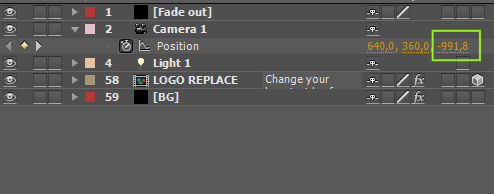
Go to Layer->New->Camera and add a new camera.
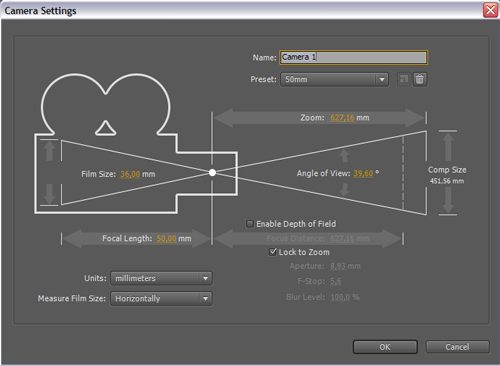
Step 23
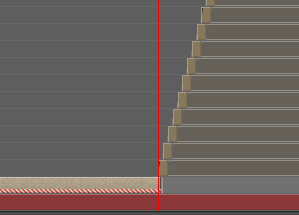
I just made a really simple camera animation. Go to the first frame and change the z property to -991, after that, go 4 seconds and change this value to -1789 and that’s it.
Conclusion
So this is it! I hope you enjoyed the tutorial and learned some new things. Try your own variations or customize the free project file that you can download at the top. My name is Tibor Miklos, thanks a lot for your attention and I’ll see ya next time! Oh and if you have any questions or you just get stuck then just write me an e-mail. [email protected].
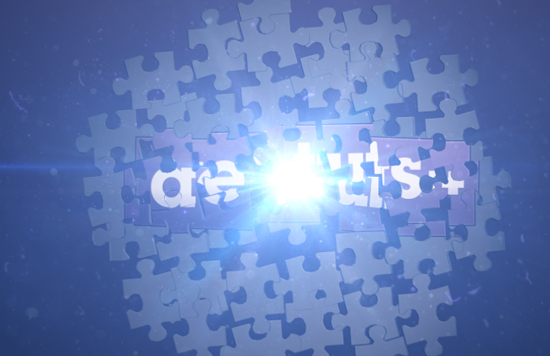
Final Image
{excerpt}
Read More