

In this tutorial I will show how to create a sailing ship illustration with a story book style, using the Gradient Mesh to make the cloth of the boat’s sails. I will also use the Gradient Mesh to colorize the wooden parts of the boat. Then, the Scribble filter and the Brushes application will be used to create the sea. Finally, I will show you how to use a mask to create a fog effect around the illustration.
Step 1
Let’s start by creating the boat’s sketch. Do this by placing two circles, one beside the other. The right circle must be slightly bigger than the left one, as shown in the example.
Step 2
Use the circles as a sketch to delineate the rounded forms of the boat. Make sure that the sinuous vertical line made on the right side goes beyond the circle borders.
Step 3
To conclude the outline of the boat’s shape, delete the two circles.
Step 4
Select everything and, in the Pathfinder panel, activate the Divide option. This will make the sinuous vertical line divide the boat’s shape into two parts.
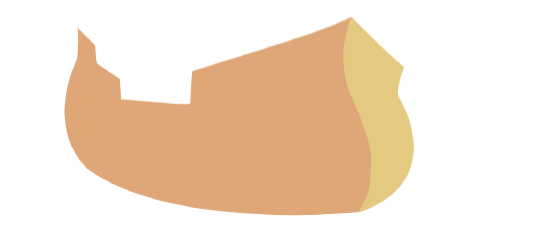
Step 5
With the Direct Selection Tool, select one part of the boat and fill it with a mid-tone color. Choose another side and fill it with a lighter color. In this example I applied #DDC0A2 (hexadecimal color) on the left side and #E7D9AE on the right.
.
Step 6
Next, create the drawing of the wood on the boat. One quick way to do this is by using the Blend Tool. Create a new layer and make a curved line above the boat’s shape. Then make another curved line below the boat’s shape, trying to follow precisely the shape’s curvature.
Step 7
Click twice over the Blend Tool icon to activate its options. In Specified Steps put 12 as the value. Click OK and with the Blend tool click over the anchor point at the end of each of the lines to apply the effect.
Step 8
Select the left side of the shape and drag a copy to a layer above the layer of lines formed by the Blend Tool. The quick way to do this is by maintaining the original object selected, then click on the selected items icon (a little colored square) on the Layers panel and, with the Option button pressed, drag the icon to the layer above.
Step 9
Now select the lines and the shape that must be above them and press Command + 7 to create a shape contour mask over the lines.
Step 10
Repeat the same process of Steps 6 to 9 for the right side of the shape.
Step 11
With the Pen tool create two strips filled with the hexadecimal color #BC9162 at the central part of the lines, as shown in the example.
Step 12
Select the mask made of lines and, on the main menu, go to Object > Expand. On the Expand panel, disable the Stroke option and click OK.
Then, use the Path Eraser Tool to create cracks between the line segments, by simply dragging the tool over the parts of the segment you wish to erase. Try to create cracks on the central parts of the lines, this will slightly break the symmetry of the lines and help with a light effect later.
Step 13
To give the lines a more organic aspect, use the Width tool to enlarge them and make them look like brush painted lines. Always click at the center of the line and drag the little selection points that appear outside. In this step you can also enrich the illustration with more details, like applying gradients on the wide boards. You can also create some squares filled with black as the boat’s small windows.
Step 14
Open a new layer below the one that contains the filled forms. Hide the visualization of all the other layers and create in this layer the other side of the boat. Take out the strokes and fill the shape with any color.
Step 15
Create lines above the shape, as shown in the example, to make the details inside the boat. Try to make the lines always exceed the limits of the shape’s contour. Select the lines and the shape, then apply the Divide function from the Pathfinder panel to create divisions over the shape.
Step 16
Once you created the divisions, make a gradient with two passages, one with a #CB8B1F color and another with a #823309 color and apply it on the smaller divisions. This will create a light effect to create volume. On the biggest shape, apply #964A27.
Step 17
Activate the visualization of the layer with the filled forms created on Step 5 and what you will see is something like the example shown here.
Step 18
Apply the Mesh Tool now over the shapes of the first layer. Drag the points of the mesh with the Direct Selection Tool to work with the light and mold the volume on the boat’s body. The brown tones that were used are #AF8B66 and #823309.
Step 19
After concluding the light and volume work, activate the visualization of the lines layer. If you like, create some other details like the wood thickness on the superior part of the stern or any type of drawing on the boat’s stem.
Step 20
In a new layer create the masts of the sails using strokes with the #754C24 color. Make the two vertical masts with a stroke that has a slightly bigger thickness than the horizontal curved sails strokes.
Step 21
Use the Line Tool to create the ropes on the masts. In a new layer create the sails contour. These sail shapes will not have a filling color right now to facilitate the view of their position over the masts.
Step 22
After positioning the sails over the masts, fill them all with #F9F7F2.
Step 23
Now create a new distortion for the sails. To do this you must select a shape and go to Object > Create Gradient Mesh in the main menu. In the Create Gradient Mesh panel options you can edit the quantity of horizontal and vertical lines that compose the mesh that will be moulded over that shape.
Try to put the same values for both rows and columns. In the example below, on the smaller sail, I applied a 6 by 6 mesh. Repeat the process on all the other sails. You can apply higher values on the bigger ones. The bigger the quantity of lines, the more details will be available on the final result.
Step 24
With the Direct Selection Tool and the Shift button pressed, select rows of anchor points, always skipping one row and selecting the next row of anchor points, until the last of the sequence. Then, insert on these points the #D2BC8F color.
Step 25
Continue using the Direct Selection Tool to drag the points and mould the distortions of the cloth. On the smaller sails you must drag the central points upwards and the lateral points downwards. Select the bigger sails and fill the lateral points with the #D2BC8F color and drag the central points upwards to create the wrinkles only on the lateral sides.
Step 26
After concluding this procedure on all sails, activate all visualizations of the other layers to see all elements of the boat concluded.
Step 27
Select all the layers and group them all. Then discard all the other empty layers and create a new layer below the boat layer. Create a rectangle to make the sea and fill it with a gradient composed of white and the #126D57 color.
Step 28
With the rectangle selected, go to Effect > Stylize > Scribble. This will apply to the gradient the effect of scribbles made by lines, ideal for simulating the movement of sea water. If you wish to have a result like the one from the example, use the same values shown in the panel below.
Step 29
On the same layer, create a bigger rectangle on the superior side. This rectangle will be the sky, fill it with a gradient composed of blue tones, starting from dark blue at the top, lighter blue at the middle, and finishing with white at the bottom.
Step 30
Create the mountains on the horizon using the Pen Tool to delineate the forms. Then, fill these forms with a gradient composed of blue and white. Apply the gradient from top to bottom, starting with blue and finishing with white, to create a fog between the sea and the mountains.
Step 31
In the Brushes library activate the Artistic Paintbrush and choose Dry Brush 2 filled with a white color or any other color of your preference to create details, such as the foam over the sea or the clouds in the sky. During the application create variations on the brush size, juxtapose some brushes and reduce the opacity of some others, specially those brushes applied on the sky.
Step 32
Let’s now make a reflected image of the ship: click twice on the Reflect Tool and create a vertical copy in the tool options.
Step 33
With the Shear Tool make a small distortion on the vertical sense to settle a little the perspective of the reflection.
Step 34
Maintain the copy selected and go to Effect > Distort, choose the option Ocean Ripple. This effect will create a well appropriate distortion. Apply a 12 value in Ripple size and a 6 value in Ripple Magnitude.
Step 35
Make a square filled with a black and white gradient that surround all the reflection. Position the gradient over the reflection.
Step 36
Select the reflection and the gradient. Now in the menu of the Transparency panel, activate the Make Opacity Mask.
Step 37
With the Gradient Tool control the direction of the transparency. It must have a 0 value at the inferior part of the reflection. Change the Blending to Multiply.
Step 38
Now select all the elements of your file and group them. Then create an ellipse filled with a white color and position it over the illustration, partially surrounding the boat. Select the group and the circle and in the Transparency panel menu activate once more the Make Opacity Mask.
Conclusion
Conclude the work by applying the Gaussian Blur filter over the mask. Yo, ho, ho, and a bottle of rum! Hop aboard!


