Build an AS3 Tetris Game From the Ground Up (ActionScript)

In this Active Premium tutorial we’ll be creating a variant of the classic Tetris game, explaining general game concepts as well as some specific to this genre.

Introduction

Let’s start with a short history lesson for those who are not familiar with this game (even though I doubt that it’s an unknown game to anyone).

Tetris is a puzzle video game from the 80s in which pieces made out of four square units (or cells) fall down in a grid (or matrix) and you have to move and rotate them until they land so that you obtain horizontal lines of units without gaps.

The pieces in the game are called tetrominoes and are geometrical shapes composed of four squares. There are five unique tetrominoes; however in the Tetris game we use two more which are reflections of two pieces from the first five.

The game was designed and programmed by Alexey Pajitnov and released in 1984 and still remains a popular game although many variations of the game were created (but using the same concept).

To read more on Tetris game, Tetrominoes, and associated topics, you can read their wiki pages: Tetris and Tetromino.

Prerequisites

For this tutorial I’ll be using FlashDevelop (see a guide to installing and using that here) but you can use whatever software you like (Flash CS3 +, Flash Builder, FDT ). If you don’t like or you can’t get FlashDevelop for whatever reason I strongly recommend that you use something other than Flash because of the weak code editor it has and because we will only be writing classes and you’ll like the features that you find in a strong code editor. But if you’ll only be copying and pasting, Flash will do just fine.
Download Build an AS3 Tetris Game From the Ground Up (ActionScript)

Create a Snow Covered Mountain Town Matte Painting (Adobe Photoshop)

A matte painting is a backdrop that filmmakers use when the scene they need doesn’t or can’t exist in real life. In the past, they were created by actually painting a scene on a canvas. Today, they are created digitally by combining photographs to produce the scene that they need. In this premium tutorial, author Ed Lopez will demonstrate how to create a snow-covered, coastal, mountain town scene using Photoshop. This is a written tutorial but it also includes about 2 hours of video instruction.

Download Create a Snow Covered Mountain Town Matte Painting (Adobe Photoshop)

Speed up Workflow in the Terminal (Web Development)

The terminal is great, especially for web development, but typing out long, obscure commands and directories deep in the filesystem can get tedious. Aliases and functions allow you to create short, memorable names for commands you type all the time. In this Premium video tutorial, we will learn how to create and use both of these to speed up your command line workflow.

Download Speed up Workflow in the Terminal (Web Development)

Obliterate Your Objects with Blender: Part 2 (Blender)

In this tutorial, Gottfried Hofmann (the creator of Blender’s particle system documentation) walks you through the modeling and setup stages involved with obliterating a logo into silvery dust! Part 2 of the series consists of two videos and will go on to deal with finalising the scene and getting the look you want. The tutorial also includes full Blender scene-files as well.

Tutorial Series Details

  • Author: Gottfried Hofmann
  • Software: Blender 2.5
  • Difficulty: Intermediate/Advanced

Other Parts In This Series

Download Obliterate Your Objects with Blender: Part 2 (Blender)

Obliterate Your Objects with Blender: Part 1 (Blender)

In this tutorial, Gottfried Hofmann (the creator of Blender’s particle system documentation) walks you through the modeling and setup stages involved with obliterating a logo into silvery dust! Part 2 of the series consists of two videos and will go on to deal with finalising the scene and getting the look you want. The tutorial also includes full Blender scene-files as well.

Tutorial Series Details

  • Author: Gottfried Hofmann
  • Software: Blender 2.5
  • Difficulty: Intermediate/Advanced

Other Parts In This Series

Download Obliterate Your Objects with Blender: Part 1 (Blender)

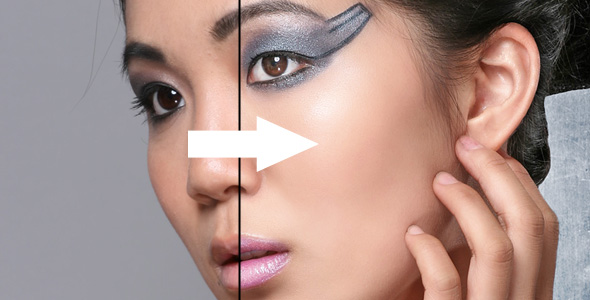
Beauty Modelling Photo Retouching (Photo Retouching)

A tutorial covering, in depth, all the entire workflow of retouching a beauty modelling photo. Through a 70 minute video tutorial, I will take you through basic colour correction, skin smoothing, the liquify tool, doing details such as lips, eyes and make-up, fixing lighting, adding backgrounds, cutting out the picture, and more!

Each tool used is explained thoroughly, so you understand what’s going on all the time.

If you need to gain knowledge on how to retouch full-body modelling photographs in a professional manner, then this tutorial is for you!

Check out both the preview video and preview images for a sneak-peak at what you’ll learn, and a before/after comparison.

You also get the very same PSD that is worked on in the tutorial!
(Note: accompanying .psd is watermarked and lower resolution)

Model:
Asahi aka manwomanfilm
http://www.youtube.com/manwomanfilm

Music in preview:
Pablo Gómez – What you think

Interested in a more detailed tutorial on facial retouching? Check out my other tutorial!
Glamour Portrait Photo Retouching

Download Beauty Modelling Photo Retouching (Photo Retouching)

The Skateshop: Part 3 (Autodesk Maya)

Set extension and/or CG integration with live action footage is a key aspect of Visual Effects work, and it’s our job as CG artists to ensure that we use a suitable workflow for the job at hand. In this detailed 3-day tutorial series, Alvaro Castañeda shows us one possible workflow, moving from PFTrack for tracking, to Maya for modelling, texturing and rendering, and then compositing the result in Maya Composite, having used AE along the way! ‘The Skateshop’ is an unmissable tutorial for anyone looking to get into VFX .

Tutorial Series Details

  • Author: Alvaro Castaneda
  • Software: Autodesk Maya
  • Software: Adobe After Effects
  • Software: PFTrack
  • Difficulty: Intermediate

Other Parts In This Series

Download The Skateshop: Part 3 (Autodesk Maya)

The Skateshop: Part 2 (Autodesk Maya)

Set extension and/or CG integration with live action footage is a key aspect of Visual Effects work, and it’s our job as CG artists to ensure that we use a suitable workflow for the job at hand. In this detailed 3-day tutorial series, Alvaro Castañeda shows us one possible workflow, moving from PFTrack for tracking, to Maya for modelling, texturing and rendering, and then compositing the result in Maya Composite, having used AE along the way! ‘The Skateshop’ is an unmissable tutorial for anyone looking to get into VFX .

Tutorial Series Details

  • Author: Alvaro Castaneda
  • Software: Autodesk Maya
  • Software: Adobe After Effects
  • Software: PFTrack
  • Difficulty: Intermediate

Other Parts In This Series

Download The Skateshop: Part 2 (Autodesk Maya)

The Skateshop: Part 1 (Autodesk Maya)

Set extension and/or CG integration with live action footage is a key aspect of Visual Effects work, and it’s our job as CG artists to ensure that we use a suitable workflow for the job at hand. In this detailed 3-day tutorial series, Alvaro Castañeda shows us one possible workflow, moving from PFTrack for tracking, to Maya for modelling, texturing and rendering, and then compositing the result in Maya Composite, having used AE along the way! ‘The Skateshop’ is an unmissable tutorial for anyone looking to get into VFX .

Tutorial Series Details

  • Author: Alvaro Castaneda
  • Software: Autodesk Maya
  • Software: Adobe After Effects
  • Software: PFTrack
  • Difficulty: Intermediate

Other Parts In This Series

Download The Skateshop: Part 1 (Autodesk Maya)

Create a Pinboard Effect in Houdini: Part 2 (Software)

This tutorial follows Houdini artist Alvaro Castaneda as he walks you through the creation of this awesome animated pinboard effect in Houdini. Part 1 covers the creation of the model, while part 2 covers the animation and rendering of the pinboard effect.

Tutorial Series Details

  • Author: Alvaro Castaneda
  • Software: Houdini
  • Difficulty: Beginner/Intermediate

Other Parts In This Series

Download Create a Pinboard Effect in Houdini: Part 2 (Software)

Create a Pinboard Effect in Houdini: Part 1 (Software)

This tutorial follows Houdini artist Alvaro Castaneda as he walks you through the creation of this awesome animated pinboard effect in Houdini. Part 1 covers the creation of the model, while part 2 covers the animation and rendering of the pinboard effect.

Tutorial Series Details

  • Author: Alvaro Castaneda
  • Software: Houdini
  • Difficulty: Beginner/Intermediate

Other Parts In This Series

Download Create a Pinboard Effect in Houdini: Part 1 (Software)

Create a Retro Electronic Safe Lock Interface (Adobe Photoshop)

Photoshop can be used to create interfaces for all sorts of applications in addition to websites. In this premium tutorial, author Diego Monzon will demonstrate how to create a retro style electronic safe lock interface using both Photoshop and Illustrator.

Download Create a Retro Electronic Safe Lock Interface (Adobe Photoshop)

Mac-10 Submachine Gun: Part 3 – Texturing (Autodesk 3Ds Max)

In the third and final part of this monstrous, 10 hour tutorial series CG artist Ben Tate, will demonstrate how to create realistic high resolution textures for his high-end Mac-10 sub-machine gun model. This series is a must see for any artist that wants to level up their skills in high quality CG weapon creation, or just become better at texturing in general!

Over the course of this 10 hour monster of a tutorial, you will gain access to time saving professional gun modeling tricks and techniques that are universal to any 3d modeling application. We’ll give you an in-depth look at using the revolutionary and intuitive Headus UVLayout to quickly and effectively lay out all of the gun’s UVs, and finally, some tried tested and true texture painting techniques that use a careful balance between diffuse, specular, and bump maps to create realistic and convincing final metal textures. Follow professional CG artist and Cgtuts+ Co-Editor Ben Tate, as he demonstrates his entire process of modeling, UV mapping and texturing an extremely high quality Mac-10 sub-machine gun.

Tutorial Series Details

  • Author: Ben Tate
  • Software: Autodesk 3Ds Max 9
  • Software: Adobe Photoshop
  • Software: Headus UVLayout (Trial Version)
  • Difficulty: Intermediate/Advanced

Other Parts In This Series

Download Mac-10 Submachine Gun: Part 3 – Texturing (Autodesk 3Ds Max)

Mac-10 Submachine Gun: Part 2 – UVMapping (Autodesk 3Ds Max)

Follow CG artist Ben Tate, as he demonstrates how to use a combination of 3ds Max’s traditional UVW Unwrap modifier, and Headus UV Layout’s innovative and intuitive UV tools, to quickly slice up his model, and lay each piece down with minimal distortion and in record time! Don’t have UV Layout or 3ds Max, not a problem. Throughout the entire process, the emphasis will be kept firmly on universally transferable UV mapping approaches and techniques, that can be easily be achieved using any 3d application that is capable of UV mapping.

Over the course of this 10 hour monster of a tutorial, you will gain access to time saving professional gun modeling tricks and techniques that are universal to any 3d modeling application. We’ll give you an in-depth look at using the revolutionary and intuitive Headus UVLayout to quickly and effectively lay out all of the gun’s UVs, and finally, some tried tested and true texture painting techniques that use a careful balance between diffuse, specular, and bump maps to create realistic and convincing final metal textures. Follow professional CG artist and Cgtuts+ Co-Editor Ben Tate, as he demonstrates his entire process of modeling, UV mapping and texturing an extremely high quality Mac-10 submachine gun.

Tutorial Series Details

  • Author: Ben Tate
  • Software: Autodesk 3Ds Max 9
  • Software: Adobe Photoshop
  • Software: Headus UVLayout (Trial Version)
  • Difficulty: Intermediate/Advanced

Other Parts In This Series

Download Mac-10 Submachine Gun: Part 2 – UVMapping (Autodesk 3Ds Max)

Mac-10 Submachine Gun: Part 1 – Modeling (Autodesk 3Ds Max)

In the first part of this mammoth series, we will discuss a variety of efficient and innovative modeling techniques to create a medium density model. You will learn how to break the model down into into its respective parts in the blockout stage, and the approaches and tools to use when crafting the more complex shapes and parts.

We’ll also discuss where and where not to use subdivision modeling to speed things up further. This tutorial is intended for intermediate to advanced CG artists who are looking to take their skills up a notch, or maybe learn a new trick or two.

Over the course of this 10 hour monster of a tutorial, you will gain access to time saving professional gun modeling tricks and techniques that are universal to any 3d modeling application. We’ll give you an in-depth look at using the revolutionary and intuitive Headus UVLayout to quickly and effectively lay out all of the gun’s UVs, and finally, some tried tested and true texture painting techniques that use a careful balance between diffuse, specular, and bump maps to create realistic and convincing final metal textures. Follow professional CG artist and Cgtuts+ Co-Editor Ben Tate, as he demonstrates his entire process of modeling, UV mapping and texturing an extremely high quality Mac-10 submachine gun.

Tutorial Series Details

  • Author: Ben Tate
  • Software: Autodesk 3Ds Max 9
  • Software: Adobe Photoshop
  • Software: Headus UVLayout (Trial Version)
  • Difficulty: Intermediate/Advanced

Other Parts In This Series

Download Mac-10 Submachine Gun: Part 1 – Modeling (Autodesk 3Ds Max)